Puuh, geschafft...ganz schön aufwendig, so ein Tutorial. Immerhin hat mich der Contest bei Sewmamasew jetzt motiviert, endlich mal einen zu machen. Aber eben wegen dieses Contests ist er zunächst nur auf englisch-schon ein bisschen peinlich. Auf dem "Zuschneidefoto" könnt ihr aber auch cm-Angaben lesen und ich werde sicher in den nächsten Tagen noch eine deutsche Fassung dazwischenschreiben, aber im Moment stehen noch so viele andere Sachen (nicht nur nähtechnischer Natur) an, verzeiht bitte!
Um für die Anleitung Fotos machen zu können, musste ich noch eine solche Tasche nähen...ich werd sie gleich bei Dawanda einstellen, denn ich habe ja schon eine ;o)
Phew, it's done! Very elaborate, such a tutorial. It's my first and I say sorry to all my german readers, because for the moment it's only written in english...I'll add a german version later, today I've so much other things to do.
Since I had to sew another bag for making the photos for the tutorial, which I do not need actually because I've already one, this will be available here at dawanda, (our german etsy) ;o)
25.4.08
24.4.08
My handbag-Tutorial
This is my tutorial for the handbags or tote bags shown here.
It's written also for the tutorial-contest from sewmamasew. I hope you'll enjoy! And I hope my english is not too difficult to understand ;-)

The required materials:
-about 3/4 yard fabric for the outside. Please take a heavier weight, maybe upholstery quality or home decoration fabric. (My two fabrics in the tutorial are from ikea).
-3/4 yard fabric for the lining, this can be also heavy weight or midweight (patchwork-fabric).
-interfacings:
For the upper piece take something that makes a good stiffness, mine is this, it feels a little bit like cardboard.
For the lower piece I use this iron-on volume fleece, a fusible volume fleece with 1/4 inch thickness.
-one keyring or D-Ring.
-one sew-in snap (1/2 inch diameter)
-some fabric glue
Cutting pieces:
All measures include a 3/8 inch seam allowance.
 Upper bag-piece:
4 1/2 inch x 14 1/2 inch
cut two of the outer fabric, two of the lining fabric.
Cut two of the stiff interfacing but theses two about 3 1/2 x 13 1/2 inch! They must be smaller than the sewn piece, otherwise the fabric can't turn well in the seams.
Lower bag-piece:
13 inch x 19 inch
cut two of the outer fabric, two of the lining fabric and two of the volume fleece, theses two a little bit smaller for better ironing on (better for your iron-board...)
Shoulder Strap:
3 1/4 inch x 29 inch
Cut one of the outer fabric, one of the lining and one (a little bit smaller) of the volume fleece. You could also choose to make the shoulder strap on both sides of the outer fabric.
Inside pocket:
7 1/2 inch x 6 inch
cut out of lining fabric
Keyring-strap:
1 1/2 inch x 11 inch
cut out of lining fabric
Prepare the outer fabric:
Iron on all interfacings, set aside and let cool-down.
Prepare the lining:
Sew the inside pocket:
Fold over the longer side of the pocket piece twice 1/2 inch wide, iron and sew a seam in 3/8 distance to the edge. Iron the sewing allowance (3/8 inch) of the other sides to the middle, sew the pocket on one of the lower pieces in the middle of the upper long edge, in 1 inch distance to the edge. If desired make a pencil pocket by making an extra seam in 1 inch distance to one smaller side on the ready pocket.
Sew in the snap in the middle of the upper piece, in a bit smaller distance to the upper edge than to the lower. If you use midweight fabric, firm the fabric on this point with a small piece of interfacing.
With a bias-tape maker form a strap out of the keyring-strap piece (or sew the longer side of the piece, right sides together, turn round) and topstitch. Put aside.

Shoulder strap:
Sew the two shoulder-strap pieces right sides together ond turn round.
Iron carefully and topstitch on both sides. Set aside.
Making the folds in the lower pieces:
Mark four points on each side of the upper (longer) edge of the lower bag-pieces.
Go from the shorter cutting edge to the middle, in 2 inch distance to the edge is point 1, go 1 1/4 inch further to point 2, go 2 inch further to point 3 and 1 inch further to point 4.
Mark these 4 points on all pieces. Now look on the right side of the pieces, make the folds by folding point 1 on point 2 and point 3 on point 4. The folds must show to the middle as shown on the photo(-at this point of writing my tutorial I discovered making a mistake at the folds- only the left side of the front piece on the photo is correct!) Fix with a pin.
Sew all upper pieces on the lower pieces, be sure to make a spare between the stiff interfacing of the upper piece and the seam!
Iron the seam allowances to the upper piece and topstitch. (Topstitching at this point is easier, the finished bag is very balky to handle because of the stiff interfacings.)
Sew the outside pieces together, right sides on each other.
Sew the lining pieces together, leave a 10 inch spare open in the bottom for turning the bag.
Sew the corners:
 Fold all bottom corners together seam on seam (right side to right side), press seams apart. For finding the right position measure like shown on the photo, the seam must be in the middle.
 Now measure a point 2 1/2 inch from the sewn corner, mark on both sides and sew a slight rounding from point to point.
 Repeat on the other corners and trim it.
Now please turn the outer bag, sorry, it is a bit delicate.
Put the "two bags" together:
 Put the shoulder strap on the outside bag, the joining seams of the upper piece must be in the middle of the strip, the strap must show down, the seam allowances show in the same direction! Fix with some stitches on the seam allowance.
In the middle of one strap-end fix both ends of the keyringstrap in the same way, the ring is already on the strap.
 The lining-bag is wrong-side out, pull it over the outside-bag (which is right side-out) and stitch the upper edge. Be careful not to come in small distance to the firm interfacing.
Turn the lining bag in the outside bag, topstitch the edge. Arrange the lining in good position inside and topstitch the side-seam on both sides like shown on the photo.
Look through the spare in the lining and fix the lining around the snap-closure area with some fabric glue on the outerfabric (inside the two bags).
Close the spare in the lining.
Fill your bag with all what you need and go, making friends jealous!!
It's written also for the tutorial-contest from sewmamasew. I hope you'll enjoy! And I hope my english is not too difficult to understand ;-)

The required materials:
-about 3/4 yard fabric for the outside. Please take a heavier weight, maybe upholstery quality or home decoration fabric. (My two fabrics in the tutorial are from ikea).
-3/4 yard fabric for the lining, this can be also heavy weight or midweight (patchwork-fabric).
-interfacings:
For the upper piece take something that makes a good stiffness, mine is this, it feels a little bit like cardboard.
For the lower piece I use this iron-on volume fleece, a fusible volume fleece with 1/4 inch thickness.
-one keyring or D-Ring.
-one sew-in snap (1/2 inch diameter)
-some fabric glue
Cutting pieces:
All measures include a 3/8 inch seam allowance.
 Upper bag-piece:
cut two of the outer fabric, two of the lining fabric.
Cut two of the stiff interfacing but theses two about 3 1/2 x 13 1/2 inch! They must be smaller than the sewn piece, otherwise the fabric can't turn well in the seams.
Lower bag-piece:
13 inch x 19 inch
cut two of the outer fabric, two of the lining fabric and two of the volume fleece, theses two a little bit smaller for better ironing on (better for your iron-board...)
Shoulder Strap:
3 1/4 inch x 29 inch
Cut one of the outer fabric, one of the lining and one (a little bit smaller) of the volume fleece. You could also choose to make the shoulder strap on both sides of the outer fabric.
Inside pocket:
7 1/2 inch x 6 inch
cut out of lining fabric
Keyring-strap:
1 1/2 inch x 11 inch
cut out of lining fabric
Prepare the outer fabric:
Iron on all interfacings, set aside and let cool-down.
Prepare the lining:
Sew the inside pocket:
Fold over the longer side of the pocket piece twice 1/2 inch wide, iron and sew a seam in 3/8 distance to the edge. Iron the sewing allowance (3/8 inch) of the other sides to the middle, sew the pocket on one of the lower pieces in the middle of the upper long edge, in 1 inch distance to the edge. If desired make a pencil pocket by making an extra seam in 1 inch distance to one smaller side on the ready pocket.
Sew in the snap in the middle of the upper piece, in a bit smaller distance to the upper edge than to the lower. If you use midweight fabric, firm the fabric on this point with a small piece of interfacing.
With a bias-tape maker form a strap out of the keyring-strap piece (or sew the longer side of the piece, right sides together, turn round) and topstitch. Put aside.

Shoulder strap:
Sew the two shoulder-strap pieces right sides together ond turn round.
Iron carefully and topstitch on both sides. Set aside.

Making the folds in the lower pieces:
Mark four points on each side of the upper (longer) edge of the lower bag-pieces.
Go from the shorter cutting edge to the middle, in 2 inch distance to the edge is point 1, go 1 1/4 inch further to point 2, go 2 inch further to point 3 and 1 inch further to point 4.
Mark these 4 points on all pieces. Now look on the right side of the pieces, make the folds by folding point 1 on point 2 and point 3 on point 4. The folds must show to the middle as shown on the photo(-at this point of writing my tutorial I discovered making a mistake at the folds- only the left side of the front piece on the photo is correct!) Fix with a pin.

Sew all upper pieces on the lower pieces, be sure to make a spare between the stiff interfacing of the upper piece and the seam!

Iron the seam allowances to the upper piece and topstitch. (Topstitching at this point is easier, the finished bag is very balky to handle because of the stiff interfacings.)

Sew the outside pieces together, right sides on each other.
Sew the lining pieces together, leave a 10 inch spare open in the bottom for turning the bag.
Sew the corners:
 Fold all bottom corners together seam on seam (right side to right side), press seams apart. For finding the right position measure like shown on the photo, the seam must be in the middle.
 Now measure a point 2 1/2 inch from the sewn corner, mark on both sides and sew a slight rounding from point to point.
 Repeat on the other corners and trim it.
Now please turn the outer bag, sorry, it is a bit delicate.
Put the "two bags" together:
 Put the shoulder strap on the outside bag, the joining seams of the upper piece must be in the middle of the strip, the strap must show down, the seam allowances show in the same direction! Fix with some stitches on the seam allowance.
In the middle of one strap-end fix both ends of the keyringstrap in the same way, the ring is already on the strap.
 The lining-bag is wrong-side out, pull it over the outside-bag (which is right side-out) and stitch the upper edge. Be careful not to come in small distance to the firm interfacing.
Turn the lining bag in the outside bag, topstitch the edge. Arrange the lining in good position inside and topstitch the side-seam on both sides like shown on the photo.

Look through the spare in the lining and fix the lining around the snap-closure area with some fabric glue on the outerfabric (inside the two bags).

Close the spare in the lining.
Fill your bag with all what you need and go, making friends jealous!!
23.4.08
Radiergummis - rubbers

Ab und an fallen einem Dinge ein, die kommen einem so blöd vor, daß man sich entweder nicht traut, sie zu verwirklichen oder nicht traut, jemandem davon zu erzählen...
Mein Mann jedenfalls findet es albern, aber mir macht es Riesenspass: Stempel schnitzen aus Radiergummis! Inzwischen habe ich festgestellt, daß ich nicht die einzige bin, die das gerne macht und in den USA (natürlich, wo sonst) gibt es auch extra Material dafür. Hier muss man die Schreibwarenläden nach großflächigen Radierern absuchen oder nach denen suchen, die aussehen wie Geldscheine, ab und an gibts sowas ja. (Wenn einer ne Quelle findet, her damit!!)Jedenfalls traue ich mich hier und jetzt, es zzuzugeben, ich mache das gerne!
Die auf dem Foto habe ich gestern gemacht. Ausser dem Fliegenpilz und dem "D", für dickespaulinchen, das hab ich vor ein paar Wochen gemacht, das drumherum ist übrigens eine Katze!
Now and then I have an idea to do something, what seems to be so silly, that I have no heart to tell about or actually to do it! Anyway, my husband thinks, it's ditsy, but I love it: Scarving stamps out of erasers! Meantime I discoverd, that I'm not the only one who does so and in the US they have rubberstampsmaterial extra for scarving! Here in Germany You have to search in paperstores for larger erasers, if you're lucky you find some who are formed like papermoney. (If anyone has a good source, tell me!) By all means here and now I tell you that I love doing this! Yesterday I made those on the photo, except the mushroom and the "D" which is for "dickespaulinchen", I made several weeks ago. Around the D is a cat, for those who wondered about.
22.4.08
Neuzugänge New additions

So manches mal hab ich ja Stoffeinkäufe hier gar nicht erwähnt. Nicht, daß mir mal jemand vorwerfen würde, ich würde ja nur einkaufen, aber selber nichts produzieren!
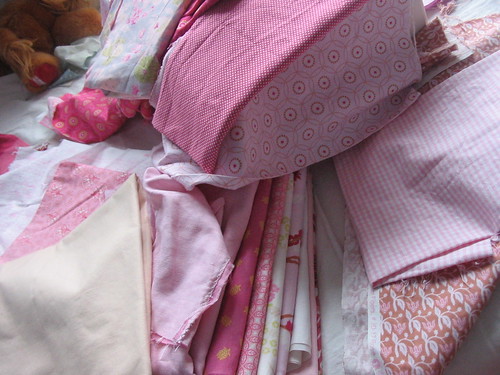
Aber selbst wenn es so wäre...Heute kam mal wieder so ein "Weihnachtspäckchen"...*schwärm*, ich kann es Euch nicht vorenthalten. Enthalten sind u.a. welche aus der neuen Amy Butler Kollektion, die mir diesmal besonders gut gefällt (die letzte fand ich nicht soooo toll), ausserdem ein toller neuer Stoff von Kokka mit Bäumen (die hab ich in der Grösse unterschätzt, da hätte ich mehr nehmen sollen) und ein gaaaanz toller mit einem "Scherenschnitt"-Druck von Robert Kaufman, und erst der gelbe mit den Vögeln von Alexander Henry und der heissgeliebte Apfel-Birnen, diesmal in pink!! Ich kam aus dem Streicheln gar nicht mehr raus! Die mit den Blümchen und Streifen sind eigentlich für meine Mutter, die hat heute Geburtstag. Aber ihre Geschenke hat sie ja eigentlich schon bekommen, hmmm....
Ausserdem kamen noch einige Bänder, davon habe ich noch zu wenig, ich habe da so eine Idee. Sind sehr schöne dabei! Und Rasselscheiben und Glöckchen, ich wollte mich mal an Babyspielzeug versuchen.
Some of my fabric purchases I didn't announced in my blog, because I feared, some of you could guess I would only shop but do not do enough output!
But even if it were true...today arrived one of these "christmas-packages", *adore* I can't keep it at myself!
First of all I got some of the gorgious new Amy Butler prints (the last collection I didn't love that much), then a wonderful new kokka print with trees (which I expected smaller, I should have purchased more of this), from Robert Kaufman a somehow "papercutprint", I like it veeeery much, and this Alexander Henry Birdie, isn't it great? The well-loved apple and pears, now in pink!! I couldn't stop cuddling them! The two with roses and stripes are actually for my mothers birthday today, but on the other hand she got her presents already, hmmm...
Furtherwise arrived some new trims, I do not have much trims already and I have something in my mind to do with them. And some rattling-boxes and bells, I want to create some babytoys.

Ausserdem habe ich noch vor ein paar Tagen eine Kittycraft-Bestellung bekommen, diese Stoffe kann man eigentlich nur für Täschchen verbrauchen. Aber süüüsss, oder? Babyspielzeug wär noch ne Idee.
Then I got an order from Kittycraft some days ago, I think these fabrics are only useful for little bags and pouches. But cute, aren't they? Maybe also an idea for babytoys.
16.4.08
Blog-Lese-Futter für Taschenfans - Blog reading matter for baglovers

Für alle Taschennäherinnen, vor allem die, die auf die Anleitung für meine Taschen warten hab ich hier schon mal ein Leckerchen gefunden, einen tollen Shop und den dazugehörigen Blog:
For all of you, who love sewing bags (first of all, those who are waiting for the tutorial for my handbags) I found some yummie links to a UK-craft shop and the connecting blog:
U-handbag-Shop
U-handblog
Das tolle: Ganz viele verschiedene Taschen sind in Schritt-für-Schritt-Anleitungen sogar als PDF runterladbar! Echt super, das geht doch viel schneller als ausprobieren.
Und das benötigte Zubehör kann man im Shop gleich bestellen, sogar schöne Stoffe gibt es ! Bin rundum begeistert.
The best: They have several bag-tutorials online, which you can download as PDF! Amazing, thats much easier and faster than try and error... And the required accessories can all be purchased in the shop, even nice fabrics are available. I'm thrilled!
Zwei der Taschen, für die es Anleitungen gibt:
Two of the bags from the Tutorials:


30.3.08
Neue Taschen brauchen die Frauen-New bags need the women
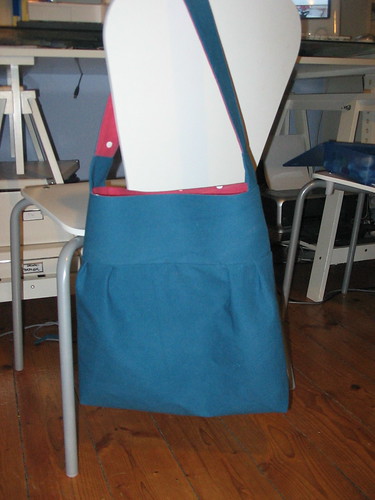

Ich hab schon öfter bei Etsy und Dawanda schöne Taschen gesehen, die ein bisschen aussahen wie ein Rock mit breiter Passe. Die gefielen mir so gut, daß ich jetzt auch so einen Schnitt erstellt habe. Voila, die petrolfarbene ist meine, ich liebe sie! Und die in beige ist für meine Schwägerin, die auch ganz glücklich war, eine zu bekommen.
Verstärkt habe ich den oberen Teil mit Schabrackeneinlage, unten mit Volumenvlies.
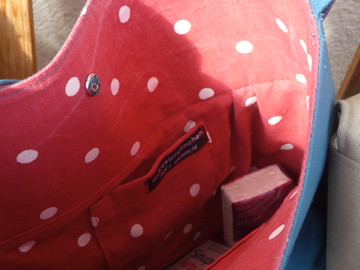
Die Stoffe sind alle von Ikea, ausser dem rotweiss gepunkteten, der als einziger etwas gelitten hat unter der Wäsche, vielleicht ne Fehlproduktion, sieht jedenfalls sehr "used" aus, das wollte ich eigentlich nicht. Aber als Futter geht es noch.
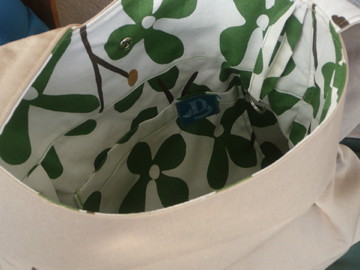
In der beigen Tasche habe ich innen ein selbstgestempeltes Logo aufgenäht. Foto folgt noch. Kann es jemand auch so erkennen?
At Etsy and Dawanda I saw several beautiful bags, which reminded me somehow to skirts with a wide yoke. I liked them so much that I scetched my own pattern now. Look, the turquois-one is mine, I love it! And the other in sand is for my sister-in-law, she was very happy to get one, too. I interfaced the upper piece with "schabrackeneinlage", a stabilizing interfacing, the lower part with fusible batting "volumenvlies". All fabrics are from ikea, except the redwhite dots, which was not so good quality, it looked very used after washing, maybe a manufacting error. But for lining it is ok, I think.
Inside the sand-bag I sewed on a selfstamped tag with a new logo. I will show a better photo soon. Does anybody see what it is?
22.3.08
Frohe Ostern! Happy Easter!
Ich wünsche allen meinen Lesern ein frohes Osterfest! Ich werde wie immer bei meiner Mutter Eier suchen, am Montag düsen wir für ein paar Tage an den Bodensee.
Vielleicht lässt sich der Frühling ja dort mal blicken.
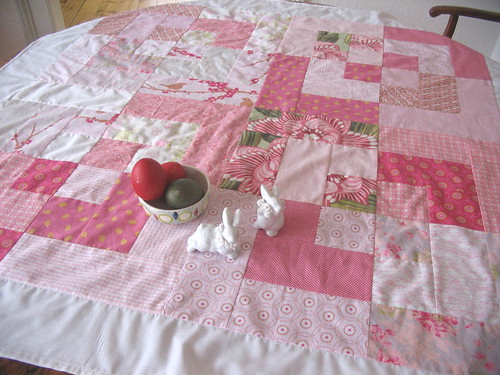
Meine fertig gewordene Frühlingstischdecke wird grade von zwei Häschen bewohnt, ich finde, sie ist sehr hübsch geworden.
I wish happy easter to all my readers! I will be at my mothers egghunting as every year, monday we go spending some days at the bodensee. Maybe spring shows there somehow. My now finished spring-tablecloth is occupied by two little rabbits, I think it has become very neat.
Ich muss mich noch bei Seemownay für den Award bedanken! Welche Ehre, ich habe noch nie sowas bekommen! Und dann auch noch für meine Quilts, wo ich doch grad erst damit angefangen habe, ich bin echt beeindruckt! Vielleicht fällt mir auch noch ein, wem ich ihn weiter verleihen könnte, aber bitte erst nach Ostern.
I must give a big thank you to seemownay fot this award! Which honour, I wasn't given something like this before! And it's concerning to my quilts, but I just started sewing quilts actually, I'm deeply impressed! Maybe I find to know somebody, whom I award it to further, after the easter days.

Dieser Preis wurde von Eseya aus Uruguay gestiftet und steht für Kunst und Kreativität.
Vielen lieben Dank, Simone!
17.3.08
Work in progress

Natürlich waren wir sehr fleissig am Samstag beim Nähtreff, ich habe eine Hose für Leopold angefangen, beim Bund hatte ich dann keine Lust mehr. Ausserdem die Ostertischdecke aus rosa gepatchten Blöcken, da kam ich bis zu den fertigen Blöcken. Heute habe ich die Hose fertig genäht, sie ist aus der aktuellen Kinder-Ottobre (1/08). Mit der Passform von Ottobresachen hatte ich ja unterschiedliche Erfahrungen gemacht und war aud das Ergebnis gespannt. Ich habe Grösse 98 zugeschnitten, was er demnächst tragen wird, es fällt auch so aus, im Vergleich zu seinen 92er Hosen ist die jetzt etwas zu groß. Also alles ok! Lediglich die Weite würde ich nicht nochmal so nähen, da kann man gut 4-5 cm abnähen pro Bein.
Actually we were really hard-working at our sewing-circle. I started sewing a boys-trousers, coming to the waistband I couldn't be bothered to finish it. Now it is done, I was very curious about it's fit and it's ok now, but the legs are very wide. When I sew this pattern again, I will sew it more close. The pattern is from the finnish magazine "ottobre", 01/08.
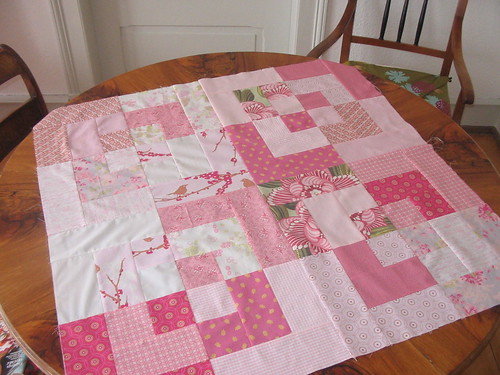
Die Blöcke der Tischdecke habe ich heute auch zusammengesetzt, jetzt werde ich noch einen weissen Rand drannähen und eine Rückseite, damit die Nahtzugaben verschwinden. Und dann wirds Frühling im Wohnzimmer!
Then I started sewing the pink blocks for the tablecloth. I finished the blockassembling today, now I make a white border and a back and then it's spring in the living room!
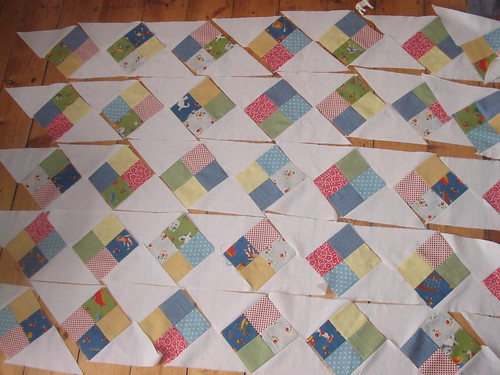
Bei meinem angefangenem Krabbelquilt musste ich feststellen, daß ich mich doch gewaltig verrechnet habe, natürlich habe ich nicht die Originalanleitung und habe versucht, mir die Grösse der (ja dann auf die Spitze gestellten) 4er-Quadrate auszurechnen um die Breite der anderen Streifen zu bekommen. Jetzt habe ich viel zu viele Quadrate und sie passen auch wenn es weniger sind nie richtig an den anderen Stoff (von dem ich nicht mehr habe). Nach kurzem Zögern habe ich jetzt neuen Stoff bestellt, dann kann ich die Decke auch breiter machen, das ist eigentlich besser. Und mit den restlichen Quadraten mache ich dann, hmmm, irgendwas anderes...
With my started crawling quilt I realized that I made a totally wrong calculation of the 4patch-squares. They are too many and don't fit the other fabric (from which I do not have more than this piece) in any way. So after thinking about I decided to order more of the less fabric, then I can make the quilt a bit wider, thats better at all. And with the left over squares I can do, er...something different.
14.3.08
Projektplanung Project planning
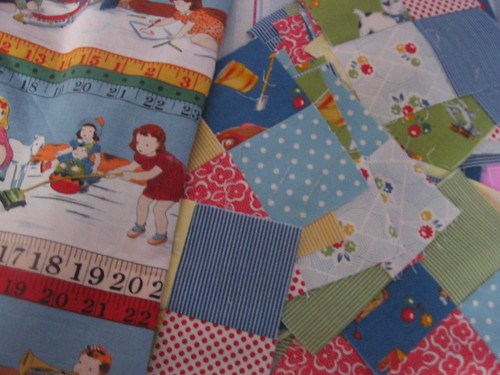
Morgen ist wieder Nähtreff, juchhuh! Aber ich weiss noch nicht so recht, was ich nähen soll. Wie immer habe ich den Kopf voller ganz dringender Ideen, keine Ahnung was da zuerst dran ist. Allerdings fiel mir vorhin ein, daß ja nächste Woche Ostern ist. Also sollte ich wohl mal an eine (Leotaugliche, also unzerbrechlich und nicht rumschleppgefährdete) Deko denken. Da ich mich seeeehr in diesen Quilt verguckt habe, habe ich beschlossen eine in Rosatönen gehaltene Tischdecke muss her. Die Planung ist abgeschlossen, das Foto der Stoffe ist hier, ich schneide dann mal zu!
Ausserdem ist der kleine Julius inzwischen ganz schön mobil, er kann sich drehen (und kommt auch wieder zurück) und liegt natürlich entsprechend viel auf dem Boden rum. Er braucht eine Krabbeldecke, jetzt! Auch hier hat eine spontane Liebe die Idee gegeben, der: Four on the Floor, aber die sind alle schön, hier. Ich nehme natürlich meine Look und Learn Stoffe die ich neulich gekauft habe, die sind so schön!
Angefangen hab ich schon.
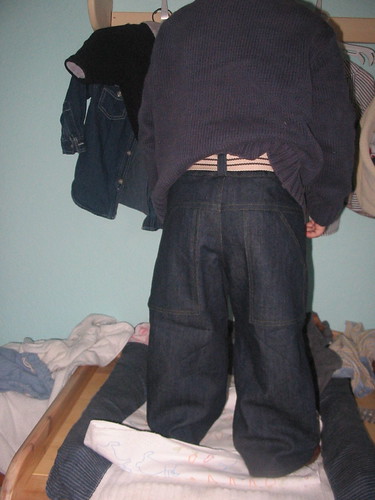
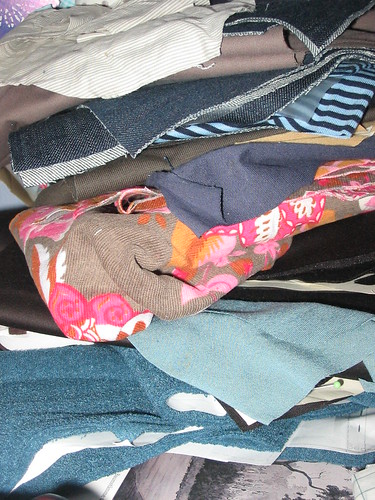
Ausserdem hab ich nix zum Anziehen...ich hab dann da mal ein bisschen was zugeschnitten ... Sind aber auch ein paar Kindersachen dabei. (Träumen wir nicht alle davon wenn wir losnähen wollen, daß alles schon zugeschnitten ist? Einfach von Stapel nehmen und los, ein Traum!)
Tomorrow we have our sewing circle, but I do not know yet, what to sew. There are so many things urgent to be done. What will be first? But I recognized that next week we have easter!! So I should make a (children undestroyable) decoration for our living room. Since I totally fell in love with this quilt
I decided to sew a tablecloth in this pattern out of pinkshades. I chose the fabrics already, now I can start cutting.
Also my little Julius is very mobile, he turns around and is lieing often on the floor, so he actually needs a crawling quilt. Here I chose also a love-at-first-sight, this: Four on the Floor. (But the others from American Jane are wonderful as well: here.)
I take all my Look and Learn fabrics I purchased some time ago, they are so beautiful!
I' ve already started.
And then I have not a rag to put on...I cut out a few things to sew, look...but there are children clothes thereby as well. (Isn't it a dream for all of us, when we want to start sewing, everything is already cut out? Just drawing it from the batch and begin. That would be great!)
Ausserdem ist der kleine Julius inzwischen ganz schön mobil, er kann sich drehen (und kommt auch wieder zurück) und liegt natürlich entsprechend viel auf dem Boden rum. Er braucht eine Krabbeldecke, jetzt! Auch hier hat eine spontane Liebe die Idee gegeben, der: Four on the Floor, aber die sind alle schön, hier. Ich nehme natürlich meine Look und Learn Stoffe die ich neulich gekauft habe, die sind so schön!
Angefangen hab ich schon.
Ausserdem hab ich nix zum Anziehen...ich hab dann da mal ein bisschen was zugeschnitten ... Sind aber auch ein paar Kindersachen dabei. (Träumen wir nicht alle davon wenn wir losnähen wollen, daß alles schon zugeschnitten ist? Einfach von Stapel nehmen und los, ein Traum!)
Tomorrow we have our sewing circle, but I do not know yet, what to sew. There are so many things urgent to be done. What will be first? But I recognized that next week we have easter!! So I should make a (children undestroyable) decoration for our living room. Since I totally fell in love with this quilt
I decided to sew a tablecloth in this pattern out of pinkshades. I chose the fabrics already, now I can start cutting.
Also my little Julius is very mobile, he turns around and is lieing often on the floor, so he actually needs a crawling quilt. Here I chose also a love-at-first-sight, this: Four on the Floor. (But the others from American Jane are wonderful as well: here.)
I take all my Look and Learn fabrics I purchased some time ago, they are so beautiful!
I' ve already started.
And then I have not a rag to put on...I cut out a few things to sew, look...but there are children clothes thereby as well. (Isn't it a dream for all of us, when we want to start sewing, everything is already cut out? Just drawing it from the batch and begin. That would be great!)
2.3.08
Wirligiggle Doll Quilt
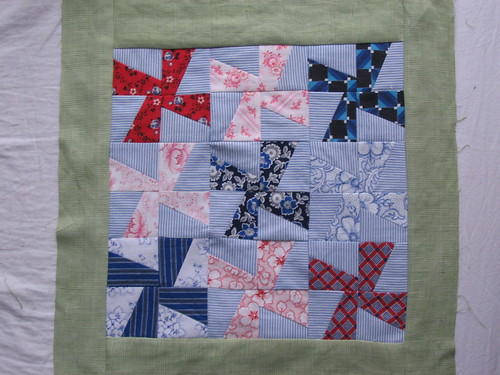
Er hat jetzt einen Rand, in grün. Bei meiner Mutter habe ich eine alte Hose von mir (auch selbstgenäht) gefunden. Die hab ich damals mit einem roten Lackfleck ruiniert und mich tierisch geärgert. Jetzt ist der Quilt doch ein bisschen bunter, passt besser zu mir.
Edit: Hier ist der Link zur Flickr-Group "Sew Mama Sew! Quilting month"
Edit: Here is the Link to the Flickr-Group "Sew Mama Sew! Quilting month"
Now it has a green border. At my mothers stash I found an old trousers (which I had sewn it for me) in green, which I ruined at that time with a red spot of paint. The quilt is now a bit more colorful, seems to be more suitable to me.
Abonnieren
Posts (Atom)